We are a group of women (but men are welcome!) who have an interest in textile art and embroidery. We are of mixed abilities and there is no need for you to be able to sew to come and join us - there are no tests!
New members are always welcome - why not call in and join us as a guest for a few months?
Meeting fee for visitors is only £5.
Our meetings vary - we have talks and workshops, show and tell - we also have lots of weekend workshops and playdays. For details of what's coming up (and what's been and gone!) check out our programme below...

Friday, 24 April 2015

Inbetweeners - Sue's Lap Quilt

Sue has been making a lap quilt as a gift for her daughter. 
She says, "I chose fabrics to go with the colours in her lounge and I used a random design.  I wanted it to look as though it really was made from old scraps of fabric (though of course it wasn't).  It's all hand-quilted."


Applications are now being accepted to be a member of Sue's extended family in the hope of receiving one of her lovely stitched gifts! 

Wednesday, 15 April 2015

Inbetweeners - "The Simple Things in Life"

Rachael has recently been published in an e-zine so I asked her to let us know all about it! 
She says : I have recently been invited to write a small article for ‘Threads-in-Fusion’, an e mag from the Thread Studio, run by Dale Rollerson.  
The magazines contains articles around a particular theme, and often describe how the writers have approached their projects.
The eighth edition is out now, and is on ‘Little Books’. I have written about my stitch sampler for the Guild, which I made by rusting some fabric and an old pair of jeans with old washers and a strong cup of tea.  The piece is called ‘The Simple things in Life’ as it has been done using very basic stitches and a simple approach.   
I have been keeping a Blog of various things I have been doing, including the sampler, which Dale noticed there. It’s funny where things lead to, but it was a nice surprise to be asked something.  

Here are a couple of photos from the online piece; Rachael will bring along a printed copy to the next meeting. (Or you can print one off and ask her to autograph it for you!)  


You will find Rachael's Blog at https://folioandfibre.wordpress.com - go and have a look, it's very inspiring! 

Monday, 13 April 2015

Inbetweeners - Rona's Roving

Rona has been to a workshop on Zen Doodling in Stitch. 

She says : "The aim of the piece was to set off with a needle and thread and doodle as you would with a pen! I got more chilled and 'looser' as I went...I may try another using one colour, and many stitches."

Here is the piece that Rona made - looks like she's done the EG Stitch-a-Month challenge all in one item! 


**Check out February and April's Blog Posts for some finished items too!**

Saturday, 4 April 2015

Inbetweeners - A Yorkshire Mixture!

Lots of members' work to show you this month!

Firstly, some pieces from Vanessa. The Seascape Playday was fully booked, but undaunted, she set out on her own voyage and produced this lovely seascape of her own, working to the same dimensions as the works pictured earlier in the year. 


Here are some details of Vanessa's piece


Also from Vanessa is her finished piece from the Hearts Playday in February. As you can see, she has covered her frame in embroidered red fabric to give a cohesive look to the piece. A great idea, if the frame you have is the right size but not quite the right colour. 


Next is Sue M's finished letter E from the Angie Hughes workshop we did last month, which Sue framed as a gift for her grand-daughter's birthday. Similar plain white deep frames are available from Ikea and make an inexpensive yet effective display case for embroidered and embellished work. 


Sue T sent me a note to say that she hadn't attempted any machine embroidery before and that this heart had taken several attempts, but you will agree that she seems to have mastered the technique now! 


Finally, Rachael has been making fabric feathers, which have been sponsored and which have helped her to raise a brilliant £370 towards Dementia Research. 
Rachael has asked me to thank everyone who has sponsored her and helped to reach this target. 
The feathers are hand-stitched on hand-dyed and layered fabric and paper, and make a very beautiful display. 


April Meeting - Yorkshire Buttons - instructions included!

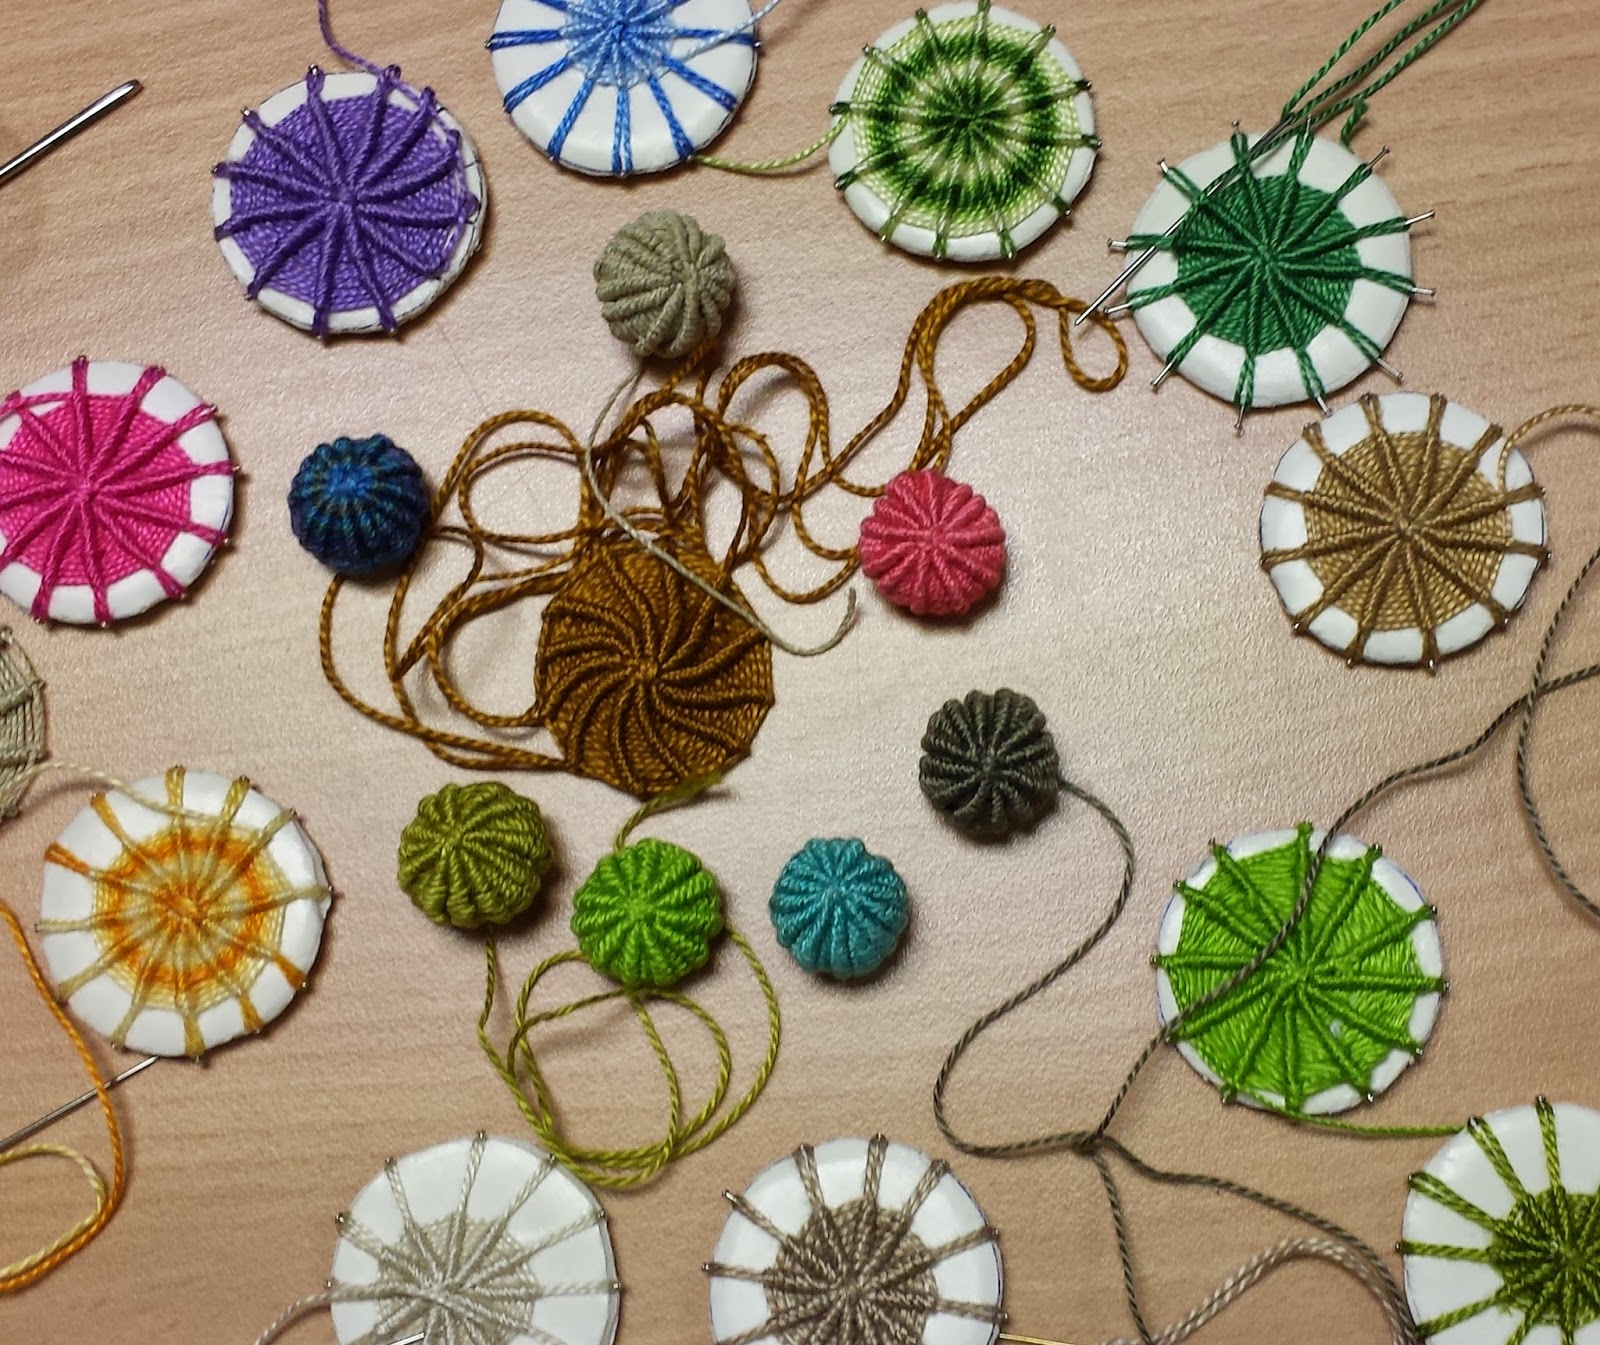
At our April meeting, which fell on Good Friday, we made Yorkshire Buttons. We had first become interested in finding out about these when we saw some antique versions on display at the Macclesfield Silk Museum during our Annual Outing in 2013. Wyn researched them and found out how they were made, and passed her knowledge on to the rest of us. 
I hope that you will be able to work out, from the pictures below and the instructions which Wyn has written, how to make them for yourself. 


You will need:
A 3cm (or thereabouts) circle of thick card or foam core board marked with dots around the perimeter as if it was a clock with twelve numbers 
4metres/4.5 yards of cotton Perle No 5
A tapestry needle 
A small piece of sticky tape 
12 pins. 
Put your pins in the edge of the card circle, one for each of your twelve dots. Don't push them fully in just yet. Make a needle hole in the centre of the circle and bring your needle and thread through from the back, leaving a 7.5cm/3inch tail at the back. Coil this up and cover it with the tape out of the way so that it doesn't tangle later. 
Wrap your thread from the centre around the pin which would be at 12 on a clock face, and then travel down to 6, wrap around 6 and then travel up to 11, around 11 and then down to 5, around 5 and then up to 10 etc until all pins have been included. It may look a bit messy, but the next stage tidies it up. 
Go back to the centre of your "clock" and go under the intersection of as many threads as you can, do this twice or three times and pull your thread tight. You will now have a tidier looking set of spokes. 
Push all your pins in as far as possible. 
Now the thread wrapping starts. Wherever your thread is, go clockwise over the top of the next thread, then go anticlockwise under the same thread and its anticlockwise neighbour. 
Repeat until the whole of the circle has been covered. 
Always clockwise over one, anticlockwise under two. 
You are doing a Spider's web stitch. (See below illustration).


It takes two or three full rotations to see the pattern emerge. Points to watch out for - occasionally let your work hang from the thread and needle to remove the twist that you will be inadvertently putting in your thread, this avoids many tangles.
"Tamp" down your stitching occasionally to compact it towards the central hub. 
When you reach the outside edge, remove the nearest pin to your thread and go through the tiny loop. Work your way around the edge, removing a pin at a time. 
Remove the tape and release the central thread. 
Remove the embroidery from the reusable card. 


Carefully "draw up" the thread and gather the circle just enough to be cup shaped and stuff with a little wadding. 
When you feel it is fat enough, draw up completely and do some tiny stitches to seal the gathering. 
Hey Presto - a Yorkshire Button. You can leave them spherical or gently squash them and make them more mandarin orange shape. You could also try putting a largish bead in the centre for a harder button. 
You could also try it on a much larger scale using the cardboard/polystyrene tray from under a pizza, and torn sari fabric. If you draw up the edge and go through each of the loops at the end, you will have a 3D fabric bowl. 

Here is a great photo of a set of buttons that Vanessa has completed since the meeting, she also found some complementary background fabric which contained some spider's web stitch :


And here are tow buttons completed by Abi : 


Wednesday, 18 March 2015

Inbetweeners - Hearts and Flowers (and Seascapes)

There were lots of lovely examples of the different ways we stitch at our last meeting. 

Firstly, Margaret's completed padded heart, which she started at the Heart Playday - you can see how she worked it if you look at the Playday post below. 
Margaret has incorporated numerous techniques into her piece - painted fabric, hand-stitching, traditional and contemporary threads and fabrics - and has included printed paper and shells to give a really rock-pool-y feeling to the finished item. 


Jenny brought a piece which she had hand-stitched, using stem stitch and satin stitch for this lovely display of Spring flowers. 


Finally Julie brought this brilliant piece of weaving, inspired by the endless seascapes that we had made. Julie used yarn from her own sheep, which she had spun and dyed (the yarn, not the sheep), and she too incorporated shells, along with some other yarns and sequins for a very contemporary effect. 


Inbetweeners - Wyn's Strip Quilt

Wyn brought this lovely strip quilt to show us. She made it from one large "jellyroll" of strips which she had bought at one of the shows. In theory, for an experienced machine stitcher, it should take an hour to sew the strips together - I guess that it would take most of us a little longer but it would still be manageable in a day. You would then have to add the wadding and backing. 
Hopefully we will soon see the finished article! 


The above pictures show the right side

This picture shows the reverse

Saturday, 7 March 2015

March Meeting and Workshop - Angie Hughes, Icons and Illuminated Letters

At our March meeting, we were lucky enough to have a visit from renowned textile artist Angie Hughes, who travelled from her home in Herefordshire to give us a talk, and stayed overnight for a workshop on the following day. (Not so lucky for Angie, whose car radiator decided that a trip to Halifax was just too much to ask). 
Angie told us about her early work at a pottery, where she learnt screen printing which led by a circuitous route to her printing on fabric and ultimately taking her City and Guilds. Textile art became her career when she realised that she had a talent for talking and teaching. She brought many samples of her work, all of which she generously passed round and allowed us to handle and photograph. These included some of the work we were going to be attempting to emulate at the following day's workshop.


A talented machine embroiderer, Angie also loves hand embroidery and uses both to great effect in her work, which features lots of velvet, felt, bonding and burning. She takes inspiration from artists including Klimt and Hundertwasser.


She is the author of a book which you may own - Stitch, Cloth, Paper and Paint - still available to buy and a valuable source of inspiration, with step-by-step instructions for the mixed media artist. 


Our Saturday Workshop was split into two groups - the "icon girls" and the "letter girls". Angie ran through what we both needed to do to start our pieces of work, and then after that she called us to the front for intermittent demonstrations of the next step to creating our respective pieces of art. 

Here is Angie starting us off, 
and then ably demonstrating how to wind thread onto a bobbin...
(this is a reference to Angie's book, where the photographer insisted on 
taking a shot of Angie threading a needle...)


This is what the icon girls were working towards : 


And this is what the letter girls were aiming for :


Both techniques involved lots of tricky remembering of which bits of foil you had to Bondaweb and iron or not iron before or after stitching but as you will see, our members did a brilliant job. 

The icon girls stitched round a photocopy of an icon which was attached to the back of a piece of black velvet, which had foil, organza and stitch applied to the front before being distressed with a (rather fierce) heat gun (paint stripper - don't try this at home!)  
Here is Abi trying not to burn herself to a frazzle.


And here are the rather brilliant results of their hard work!


Natalie managed to achieve a great distressed look and some expressive facial features where the organza had burnt back


We all loved Margaret's Saint's Tunnock's Teacakes turban 
(I know, it's a halo, but the alliteration just wasn't the same).

Abi has also got some great facial features and is still in one un-singed piece

Janice has machine embroidered lots of detail onto her iconic image

Carol is working on an image of Mary and Jesus, 
this is prior to the burning back of the organza. 

And here are the letters, which are also all "works in progress" : 

This is Sue's lovely background in pink and gold, 
with some lovely machined cable stitch borders

Wyn is working on the cover for a Peacock-themed book 
so chose beautiful blues and greens for her work

Sandra chose to do an unusual diamond background 
which she has started to embellish with hand-stitching

Net time we do a workshop I am going to tie one hand behind Jo's back. 
Here is her lovely almost-finished letter J

This is Mandy's background and the start of her letter A (for Amanda)
which will be attached once all the embellishment is finished. 

These are Alexis' lovely neat circles

This is Helen's background and letter, she has started to attach square sequins and beads to the background for a very luxurious look


This is Liz's piece, which is incredibly neat. She has couched thread around the border and has embellished the felt with french knots. 

Jane used green foil on a dark background which was very striking. 
She has started to machine stitch around the foil. 

Here are some of the pieces together at the end of the workshop. 
Huge thanks to Angie for an inspiring day. 

With any luck, some of these pieces will soon be finished so that you can see how they turned out! 

***

Please go on to have a look at the post from last month's Hearts Playday - lots of new photographs have been added.